Buried Alive

Buried Alive
Chris captures Persi buried alive!

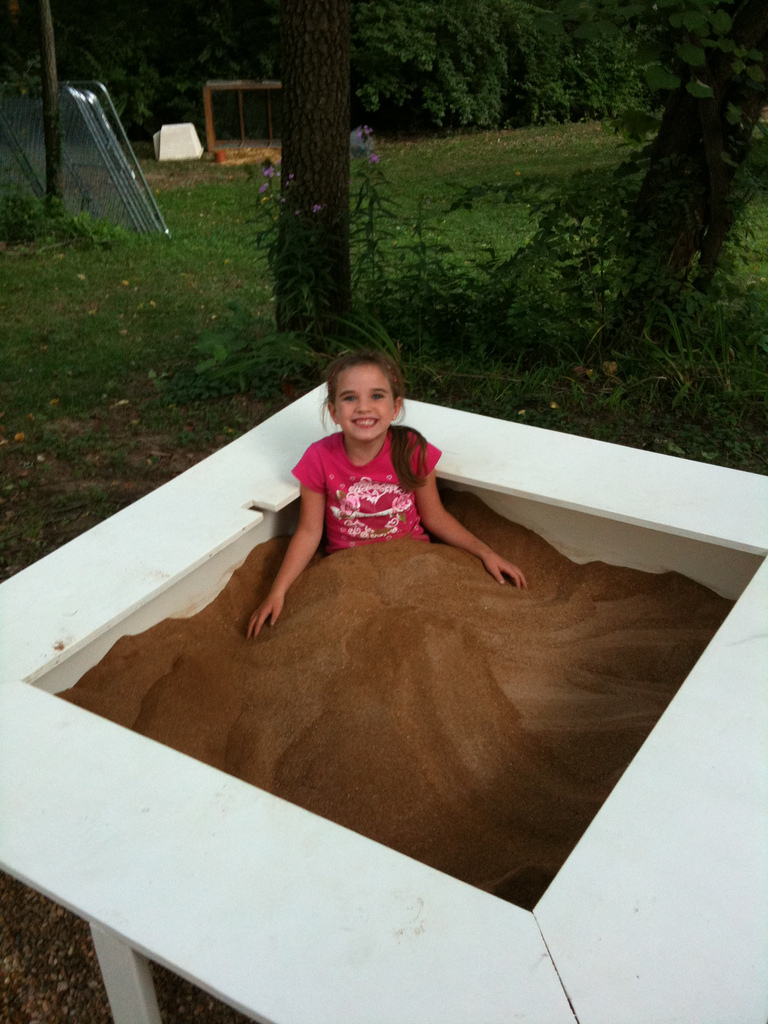
About four weeks ago, one day when the girls (Kari, my 3 year-old, and Persi, my 6 year-old niece) were being particularly wild, I told them if they were good and took a nap, I’d build them a sandbox.  They were good the rest of the day.  I promptly went online to get ideas and sketched up a plan.  I cut the wood and gathered supplies.  The following several weekends got a little hectic, so the main event was postponed until this weekend.  Considering most plans I found were just not detailed enough or cost $4.95, I figured I would type out my detailed plan here for free!

Supplies needed
1 box of 3″ galvanized nails
Staples (size does not matter)
(2) 8′ cedar 2″x12″
(2) 10′ cedar 1″x12″
(1) 12′ cedar 2″x4″
(1) 4’x4′ piece of 1/2″ plywood
(1) 6′ pine 1″x3″
(26) 1′ landscape blocks
(1) 6’x8′ tarp
(15) 50 pound bags of pea gravel
(10) 50 pound bags of play sand
1 roll of landscape fabric
1/2 gallon exterior paint
Garden staples (optional)

Tools Needed
Pencil
Stapler
Scissors
4′ Level
Hammer
Circular Saw
Speed square
Sander/Sandpaper

Sand Box in Place
Sandbox painted and in place

Of course, the landscape blocks, garden staples and pea gravel are all optional, but we chose to create a base for the girls to step out, dust off and get their shoes back on.  This bed of pea gravel also aids in drainage, so the sand won’t be setting against wet ground after a rain fall.  Where we located the sandbox was on a hill just below the level of the driveway, so without the pea gravel raising the sandbox off the ground, the sandbox would become a wet mess after a rain!

We started with an area approximately 6′ x 8′.  This pad has housed everything from a picnic table to a chicken brooder, and already had 2 landscape timbers in the ground on the lower sides forming an L.  We added 1 more landscape timber on top of the existing L to make it 2 timbers high.  We then laid down the landscape fabric over the dirt and overlapping the timbers so rocks wouldn’t leak out of the area.  If you need, insert staples into the fabric so it doesn’t move around.  We then enclosed the remaining L with landscape blocks stacked 1 high.  The supply list above has only landscape blocks and assumes the ground you’re working with is level (more needed to create a retaining wall).  The soil somewhat eroded over time, so we needed to level the inside of the play area with pea gravel first.  We poured 10 bags of gravel in the area, leaving 5 for filling in later.  We took our level and checked the level of the gravel and used the level to also spread it out.  Trust the level, even if the gravel looks otherwise to your eye!

Enjoying the New Box
Kari and Persi enjoying their new sandbox

Once your base it set, you’re ready to start cutting wood!  Notice I have chosen cedar here instead of pressure treated wood.  I prefer cedar considering I do no want the kids touching chemicals all the time.  You could use pine, but cedar holds up extremely well to the elements, and should at least be used where wood will be making contact with the ground.

Cut the cedar 2″x12″ into (2) 4′ pieces and (2) 3’10” pieces – these are your sides.
Cut the cedar 1″x12″ into (4) 5′ pieces – these are your seats.
Cut the cedar 2″x4″ into (12) 1′ pieces – these are your supports.

Assemble the sides by placing the 4′ pieces on opposite ends and the 3’10” pieces between the 4′ pieces, forming a box.  Nail 3 galvanized nails into each corner on the outside.  Nail 1 support into each corner on the inside with 2 nails – these just provide support for the box and keep pressure off of the nails when the box is moved around during construction.

Now, for the fun part – 45 degree angle cuts!  We decided to have the seats sit on the sides of the box exactly in the middle of the seat board for best support.  Cut a 45 degree angle off one end.  Measure the width of your sandbox at the edge where the seat will be.  Find the midpoint of the seat board (long) and put a mark on the side opposite the angle cut.  Use your speed square to draw the other cut.  Opposite seats should match, so you could use one as a template for the other.  You do need to measure!  Do not assume your wood is precise! (i.e. 2x4s are really a hair under 2 and a hair under 4)

We chose to put 3 nails in each seat.  We then attached a support at each corner and the midpoint of each seat on the outside edge of the seat.

Get your paint clothes on and start painting.  We had the girls help us with this part and they had a blast.  We did two coats on everything to ensure durability.

After the paint dries, flip the sandbox over in the grass or on some sawhorses, and attach the landscape fabric to the bottom with staples.  Place the sandbox on the gravel base and fill with sand!

Sand Box With Lid
Sandbox with top

While the kids are enjoying their new play area, the final piece can be constructed:  the top!  The top needs to be bigger than the hole so it doesn’t fall in.  Chris put 3′ 1″x3″ boards parallel to each other on the underside of the top to keep the top ‘snug’ in the sandbox.  Measure the inner dimension of the sandbox, but be sure not to put them too close to the exact measurement.  Give an inch of wiggle room.  Add top and cover whole box with tarp when not in use.

I would not recommend placing anchors in the play area for the tarp, but rather use a brick or two on top.  Also, do not let children lift the top by themselves!  Be sure to remove top for them and replace after play to keep sand clean.

Weekend Warriors and Bathrooms: Tile

If you’re like me, you simply cannot justify hiring a contractor when you can do the work yourself – and for much less.  In my most recent project, I tackled the bathroom.  My entire bathroom remodel cost right around $1500, including tile ($700), supplies/paint ($209), light fixtures ($203), sink ($60), toilet ($100), plumbing fixtures ($200), accessories ($100).  Considering I am a weekend warrior with many other commitments, I have worked the remodel in stages.  Most recently, Chris installed the light fixtures and I completed the shower tile.

Mentioning the act of tiling provokes in some people an unconscious twitch.  Fear not, my fellow Weekend Warriors!  I will help those of you who would like to tile and believe, like myself, in the act of Google-ing everything.  Google cannot show you the way to everything, but most things, yes.

To start tiling, first measure your area you would like to tile.  A good rule, like in photography, is not to split things in equal sections.  If you are only using one type of tile in your design, this is almost a mute point – but I will try to persuade you into a more dynamic design.  If you intend to use two different types of tile in your design, say a larger square on the lower portion and a smaller square on the upper, split the area into thirds.  You will want your larger tile to go up 1/3 of the height, then the smaller the remaining 2/3.  For example, the height to tile in my shower was 60 inches.  I used 6″ square tiles.  I placed 3 of them on the bottom creating a height of 18 inches, then the 3 inch border – this got me pretty close to 1/3 – and I tiled the remaining with the smaller tiles.  The thirds rule doesn’t have to be exact.  My 1/3 was 20 inches, but my tile went to around 21 inches.  This is not a big deal, this is just meant to make the design aesthetically pleasing.

Now that you have your area in mind and what a good 1/3 rule would be, head to the home improvement store.  Try to find tiles that would fit your area with minimal cutting.  Some stores will cut tiles for you, but it is hard to get exact measurements cut, then apply them at home.  If you will be doing a lot of cutting, I suggest renting a wet tile saw or purchasing one if it is worthwhile for you.  Do keep in mind the small tiles are very difficult to cut and may shatter, so don’t bank on cutting a lot of those.  I’ll talk about how to work with small tiles later.  While you’re purchasing your tile, you also need to figure out how much grout, thin set and supplies you need.  Some supplies to think about include:

Tiles
Thin set

Notched Trowel (smaller notches for smaller tile – 1/8″ notches are good for anything 6″x6″ and under)
Grout
Grout float
Spacers (If you buy sheets of tile, get spacers that match so grout lines are consistent throughout the project.)
Caulk
Sealer
Tile saw

Cement backerboard and non-corrosive screws

Ones you probably have at home (measuring tape, long level, utility knife, drill, pencil, plumb piece of lumber, old sponge, bucket, cleaning gloves)

Starting the new shower

The one thing on the list you might not be thinking about is backerboard.  This is something you need for all tiling jobs.  Some people just tile over drywall, but that is risky.  The backerboard can be cut with a utility knife just like drywall, but is much sturdier and mildew resistant!  Purchase enough for the area of the tiling job and some non-corrosive screws (usually right by the backerboard).  Some people install it over existing drywall, but that elevates your tile another 1/8″ – 1/4″ from the wall above it.  I cut out the old drywall from around the tub and installed the backerboard – just measure the height were you want your backerboard (48″x60″ sheets), mark a level line on the drywall, and use your utility knife to score.  To find the studs easily, mark them on the wall above the backerboard.  Screw it into place and make sure it doesn’t shift or flex.  Don’t worry about patching seams as you’ll just be putting tile over it.

Backerboard !

Once your backerboard is on, clear out any unnecessary tools (drill, utility knife, grout supplies) and trash.  Take the piece of plumb lumber, your pencil, level and start working on your tile layout.  Figure out where a level starting line would be for the tile – don’t trust the tub, it may not be level or may have a decorative edge that will fool you!  Mark level lines on your lumber where the tiles should be.  This is much better than making lines on the wall some sites promote.  Why?  You cover those lines over with thin set before you place the tile.  Get it?

Now you’re ready to tile!  Get the notched trowel with some thin set on it, smear it around on a 3’x3′ area, now use those nifty notches to level the thin set.  Scrape off any thin set excess off the trowel into the thin set bucket, use the notches at a 45 degree angle to scrape.  This will leave grooves, which are just fine even if some backerboard is showing through.  Using the notches makes the thin set level, so none of the tiles stick out more than others.  Using your lumber with marks, set the first row of tiles, then work from there.  Make sure the tiles are level to the lumber lines!  Obey the lumber – again, the tub or bottom of the wall may fool you!  Use the spacers to keep the grout lines even.  Clean off thin set on tiles and bubbling up between tiles.

New bathroom tile

When cutting tiles, make a dark line on the tiles where you need to cut.  This will wipe off and making it dark will ensure you can see it when working with the wet saw.  To do a corner, make sure the cut edge goes into the concave corner so it’s covered up by the grout in the corner.  With convex corners, make sure the cut edge isn’t sticking out, turn it so it is in the tile wall and not the edge.  You want clean, crisp edges showing.  Save fall off from cut tiles just in case they’ll work somewhere else.  With the tiny tile (under 1″), cutting is pretty difficult.  They’ll cut, but they’ll also chip.  Work them into a concave corner by pushing one side into the corner behind the others, so the other wall’s tiles will intersect with the others.  Once grouted, it’ll look nicer and be a clean edge without chipped tiles.  If you have to omit a row, it won’t look bad on a concave corner, considering the grout in the edge will cover much of the gap.  On a convex corner, think of putting a decorative piece instead.  Think creatively.  Make sure all tiles are set by giving them a firm squish into the thin set.  Let set for an hour.  Go back and make sure no tiles are sagging.  Spacers can be removed or left in for a few hours.  Let set for 24 hours.

Fenton, Dec 7, 2008

To grout the tiles, after letting set up in thin set for 24 hours, you’ll use the grout, float, sponge, bucket and gloves.  Use the float at a 45 degree angle to the grout lines and squish the grout in.  Scrape off excess by using the float at an angle.  Wipe excess into other grout lines or into grout bucket.  Work a 3’x3′ area at a time.  Start at the top and work your way down.  This is so you don’t wash the grout out when you clean the surface of the tiles.  Now, take the bucket and fill 3/4 with warm water.  Get sponge damp, but wring out so not dripping (wring in the sponge out in the empty space in the bucket so messy water doesn’t spray all over) .  Use a circular motion to clean excess grout off of the top of tiles.  Rinse sponge and change water often.  Don’t get in a rush and use a soaking sponge – this will only wash the grout out of the grout lines.

Once finished, let the grout dry for 2 days if in dry place, or 7 days in shower (at that time, seal the shower and caulk).  DO NOT try to shower with plastic covering tiles in a shower.  The moisture in the air will make the tiles moist and lengthen drying time.

Now, step back and admire your DIY tile.

Update to: Heating Small Outbuildings

One of These Things is Not Like the Other
Photo by Chris Koerner.

A few weeks ago I went down to the coop to find a 250 watt heat bulb melted through the 5 gallon bucket bottom.  The plastic was fused to the heat bulb.  I promptly unplugged the two heat lamps and opened the windows to the coop.  Luckily, plastic only smolders.  Don’t fumigate your livestock.  Nix the plastic buckets.

I made a trip to Lowe’s a few days later on a Monday evening.  As a cold snap was coming the following day, I had to rig up something, and quickly.  So, here is the new supply list:

1 outdoor extension cord with three outlets long enough to go from the outlet to the rafters (run along the walls neatly would be nice, and safer too!)
3 heat lamps with metal heat shields (buy them for $6 each at the farm supply, instead of the $12 at Lowe’s)
3 250 watt red heat lamp bulbs (spring for the name brand here – I use Phillips bulbs for around $9 each)
15 feet of chain (buy it in a pack and ask someone to cut it into pieces long enough to span between 2 rafters – it’s cheaper than getting chain by the foot) $4
6 pack of S hooks (make sure they are large enough to accommodate the links of the chain) $2

So, continuing from the old article, the power is run from the house to the outbuilding.  The outlet on the wall is first controlled by a hot water heater thermostat.  This you can set to whatever temperature you like – mine is at 45 degrees, but it is less than that as the heat lights have stayed on – the outlet will be turned “off” by the thermostat once the desired temperature is reached, then on again as needed.  I had a 15 foot chain cut into 3 5 foot pieces.  I ran my outdoor grade extension cable neatly up the wall and wrapped three times around the far rafter.  I decided to place my heat lamps about 2.5 feet apart, as the coop is 10 feet wide.  Remember, don’t put the heat lamps close to a wall or rafter!  These things get hot and will catch anything on fire if in contact! Take one length of chain, and one S hook.  Loop the chain over the far rafter and secure the end of the chain to the rest of the chain under the rafter so that the S hook is fully extended.  With slack, the chain might fall if bumped by a chicken.  Lace the lamp onto the chain through the loop above the porcelain socket.  As a precaution, I wrapped the heat lamp cord around the rafter, without leaving slack, and plugged it into the extension cord on the end of the rafter.  I did this in case a chicken bumped the chain.  The lamp would simply hang by the cord – and the worst that could happen in that situation would be a wire coming off of the contact in the lamp – easy fix.  Just make sure when you wrap your cord, you imagine the chain falling – where is your lamp going to fall?  Next to a wall?  Touching a rafter?  A straw bale?  Repeat this for all the lamps.

Keeping the coop at 40 – 50 degrees will keep chickens laying through the winter, but remember to turn the lights down to allow them to go into moult.  This is important in the chicken life cycle.  With heat lights, both the heat and the light created by the lamps alters the laying cycle.  I, personally, don’t heat the coop specifically for winter eggs.  Chickens’ combs and waddles are susceptible to frost bite.  To prevent this, simply rub petroleum jelly on the combs and wattles every few days.  I simply don’t see that as a practical, long term solution, so I’d suggest springing for the heat.

Also, if you are handy enough, these bulbs as well as an outside coop light and an automated hen door can be powered by solar energy.  Too worried about losing power with solar?  Don’t!  If the heat lamps go off in the night, as long as the coop is draft free and you leave the doors and windows shut, it should maintain the temperature until the next daylight.

Keeping Jack Frost Out

Since none of us really care for Jack Frost, nor Martin Short, in our house, let me suggest the following tips for keeping the hearth’s warmth inside and the cold out:

Windows: if they’re leaking air, get some think window plastic and tape them up.  Do buy the proper thickness of plastic and appropriate tape.  If one were to use packaging tape, they’ll be retaping the windows all winter.  Thin plastic doesn’t create a thick enough barrier, so spring for the window plastic.  It can be used for several seasons if one is neat about it.  If the plastic is hazy, use a hair dryer to smooth and shrink the plastic (for seal and clarity).  Don’t get too close – just about 6 – 9″ away.  A person could also spring for the more expensive option:  thermal windows.  Join me in throwing your arm out of socket to close them when they frequently get off track.  Once they’re aligned and closed, don’t open them.  Don’t opt for tilt in windows.  The clips do break and cause the window to fall on your husband while eating dinner.  I’d go with the plastic.

Doors: install some storm doors if the house doesn’t already have them.  Think early about storm doors and windows just in case one might have to be custom made.  This will not only protect from the heat and cold, but the hail and rain that can damage entry doors.  A rolled up towel or cute door cozy (found in crafty little towns), can eliminate much, if not all, of the draft if a door is not sealing properly.  Also look into the rubber threshold buffer to help the door seal tightly.

Furnace: to be most efficient, change your air filters.  Also, do consider getting your air ducts cleaned.  If you are a luck one to have a wood furnace, fireplace or woodstove, do get it cleaned along with the flu and chimney pipe.  One bird nest can create one heck of a house fire with a little spark.  It’s only $150 – much cheaper and safer than unexpected flames.  Do also remember to change fire alarm batteries as incidents do happen.  Consider getting carbon monoxide detectors as well – many are now combination fire/carbon monoxide units – if you have a gas furnace.  This will easily alert you to a leak and get your family outdoors before succumbing to fumes.  Also, proper tools for working with wood burning heat sources is essential.  Minimize cuts, burns and have an effienct way to put out an out of control fire.  Sand next to the unit or fireplace in a container (urn or other) can be decorative and resourceful.  Keep a fire extinguisher on each level of the home as well – and, not to be lame, but don’t be a hero.  Leave it to the fire fighters – get you and your family out if the fire is overwhelming – remember, a house can go up in less than 60 seconds.

Science: remember, heat rises.  Consider how much you really need those air vents open upstairs during the winter.  My second level is dreadfully hot if they’re left open and I save on heating if they’re closed.

Insulation: is your attic insulated?  Can it be easily?  Heat is primarily lost through the roof.  Help dwarf the heat loss with either spray or roll insulation.  For attic that are hard to navigate, consider the spray and hire professionals.  The spray insulation does not come off of clothes or skin easily.  Quote me on that.

Why Fossils ROCK!

Diatomaceous earth is absolutely fascinating. Diatomaceous earth is a compound created from fossilized diatoms.

The many uses of diatomaceous earth:

Insecticide – the powder sucks the lipids off of the exterior of the insects and causes them to dehydrate.  Can lightly be sprinkled around the base of plants, inside coops, barns, garages or where ever bugs congregate outside.

Wormer – Dosage is 1 teaspoon of food grade diatomaceous earth for dogs under 35 pounds (1 tablespoon for dogs over 35 pounds, 2 tablespoons for dogs over 100 pounds) for seven days.  Affected worms include Ascardis, Hookworm, and Whipworm.  Dosage for other animals:  Kittens 1/2 teaspoon, Cats 1 teaspoon, Puppies 1/2 teaspoon, Cattle, Cows and Hogs 2% of feed ration, Chickens 5% of feed ration, Goats and Sheep 2% in feed ration, horses 1/2 to 1 cup in feed.

Drying agent – great for drying up wet areas in coops, barns and garages.  Extremely helpful in out bulidings during the rainy season.  Even used for toxic spill clean up.  Certainly keeps the coop dry and keeps flies away.

Digestive supplement – some people stir 1 tablespoon in water daily before bed.  It contains 15 trace minerals.

Mite, flea and tick repellant for animals – lightly dust animals outdoors, avoid eyes as this is a drying agent.

Upholstery dust – lightly dust carpet or affected area.  Allow to sit for 3 days, then vacuum.

Before you think about using a chemical for a certain job, think about what you could use instead – perhaps something natural and less invasive. If you buy diatomaceous earth, just make sure what you buy is food grade.  All of the applications suggested above should only be done with food grade diatomaceous earth.  Be careful when purchasing diatomaceous earth.  When I went to my local nursery and asked for some, they handed me a bag of pesticide!  I found a fifty pound bag of diatomaceous earth online with shipping included in the price.

Heating Small Outbuildings

For the coop, I have two infrared heat lamps that I put in 3 gallon plastic buckets so the metal wouldn’t catch fire with feathers, etc. I took a short extension cord, cut it and used the male end to hook into an extension cord from the deck. I wired the bare end of the extension cord into a baseboard thermostat on the inside of the coop (you must get one that is 120 volt and water heater thermostats didn’t have the desired temp range). The thermostat then powers the outlet inside. Once it’s above 50 degress, the lamps kick off.

Cost of all materials ~$80

Heat lamps $6.50 each from Buchheit
Buckets $3 each
Cord $6.50
Thermostat $19
Bulbs $11 (noticed that name brand put off stronger heat than o ff brand)
Extension cord $10
Protective box for outdoor cord union $3
Outlet $.46
Face Plate $.20
Insulated housing $2 each
Wire nuts

Need drill, pocket knife, screwdrivers.

Took an hour. Hang lamps low (not too low to catch straw on fire, but remember heat rises). Keeps uninsulated 8×10 coop at 35 degrees in single digit windy, weather.

The House that Jack Built

After 5 months of weekends, the barn is finished. I now just have to add some finishing touches: paint, lights, cabinets, door knobs, shutters, and steps into the potting shed. My dad might even go as far as automating the chicken door and lights with solar sensors – awesome! My parents have been wonderful throughout this process supporting my crazy homesteading dream – chickens and all.

I have actually come to know my neighbors throughout this process: each coming over to pet a chicken, ask questions out of curiosity, or reminisce over guinea hen noises.

As worn out as I am now, I am excited to get back to work on the cute little barn in the spring. Pictures to come.

Exterior Home Repair

One particularly wonderful experience happened today: I needed to have gutter mesh put on my second story gutters and a piece of siding put up at the very top of the wall. Exterior Home Repair has always given me great service, but today, they gave me exceptional service. They came out to work on my house in the rain and cold and didn’t reschedule. They did a great job fixing my roof earlier in the year when squirrels decided to move in. In a few years, I’m going to call them to do the entire roof. They’re just great folks. Email me if you want their contact information.